
Welcome to Part 2 of the cross stitching series. If you missed Part 1, click below.
1) Selecting a Kit
1) Selecting a Kit
2) Prepping your Kit
6) Finishing and Framing
Now that you have your kit, there are a few things we need to do before we start stitching.
I am going to be working on a child's hooded towel kit as we go through the process. It is a terry cloth towel with aida fabric in the hood.
Let's open it up and make sure that everything is included. Most kits will contain Aida fabric, colored thread, needle(s) and instructions. Some will also have a thread palette and accessories for the finished design.
Grab a gallon or freezer size plastic zip bag to keep all of the contents of your kit in one place. This is will also keep everything clean and protected when you are not working. You should also place your hoop and embroidery scissors inside {if you don't have embroidery scissors, any small pointy scissors will work, even manicure scissors).
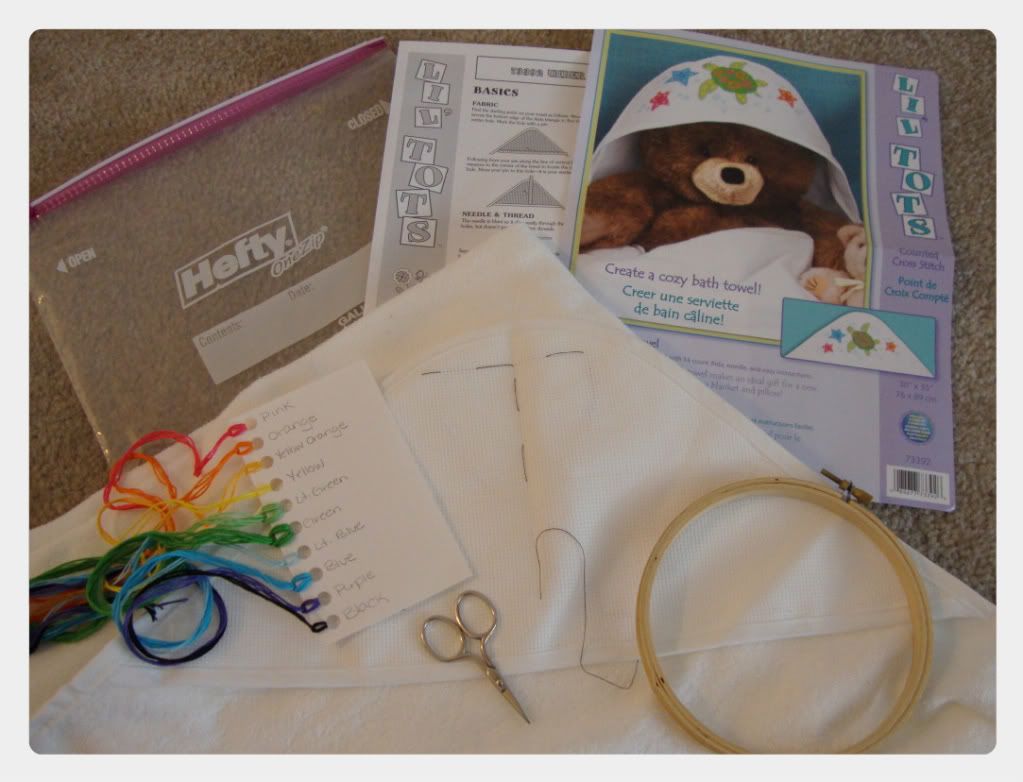
There are two more things to do before we are ready to start - sort colors and prep the fabric.
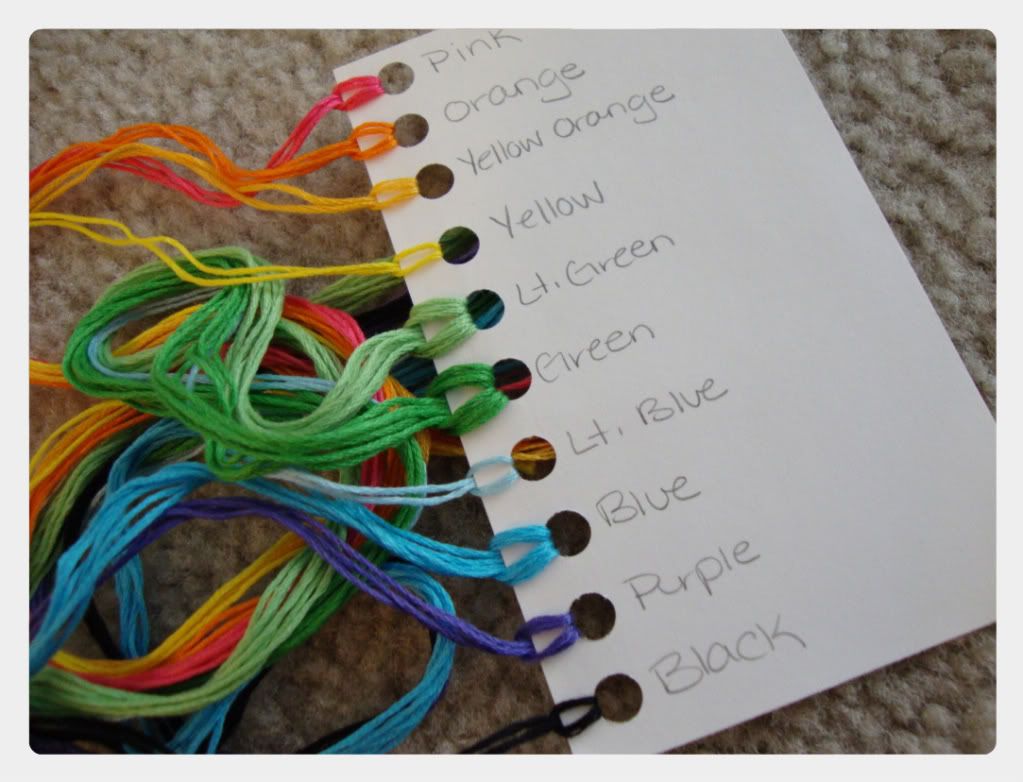
If your kit included a thread palette, lucky you. If not, they are so easy to make! Just take an index card or a piece of card stock and punch a hole for each of your colors {if you have more than 6 lengths of any color, give it two holes}. Your pattern will have a key for the colors - it will tell you the colors, how many lengths of each are included, and the symbols used for each color. Sort the colors by the order they are listed on your chart and label each color. DO NOT CUT THE THREAD.
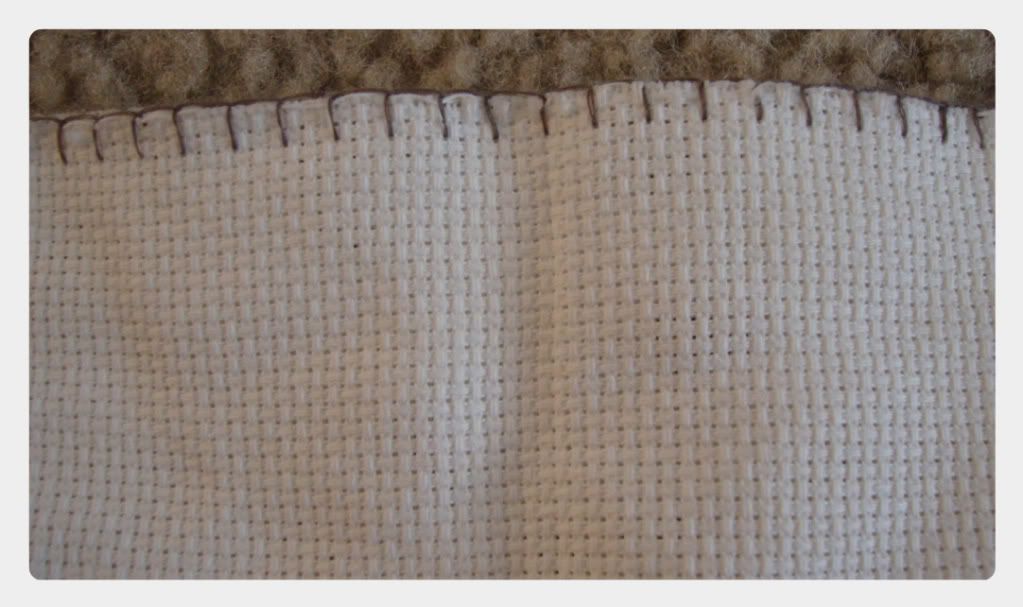
Now the fabric for the kit I am starting is already a finished part of the towel, so I can skip this step, you can too if yours is finished or you have a plastic canvas. Otherwise, the edges of the fabric need to be protected from fraying. Use some of your own thread for a blanket stitch around the perimeter. If you have a different stitch you prefer, use it, as long as it will prevent fraying.
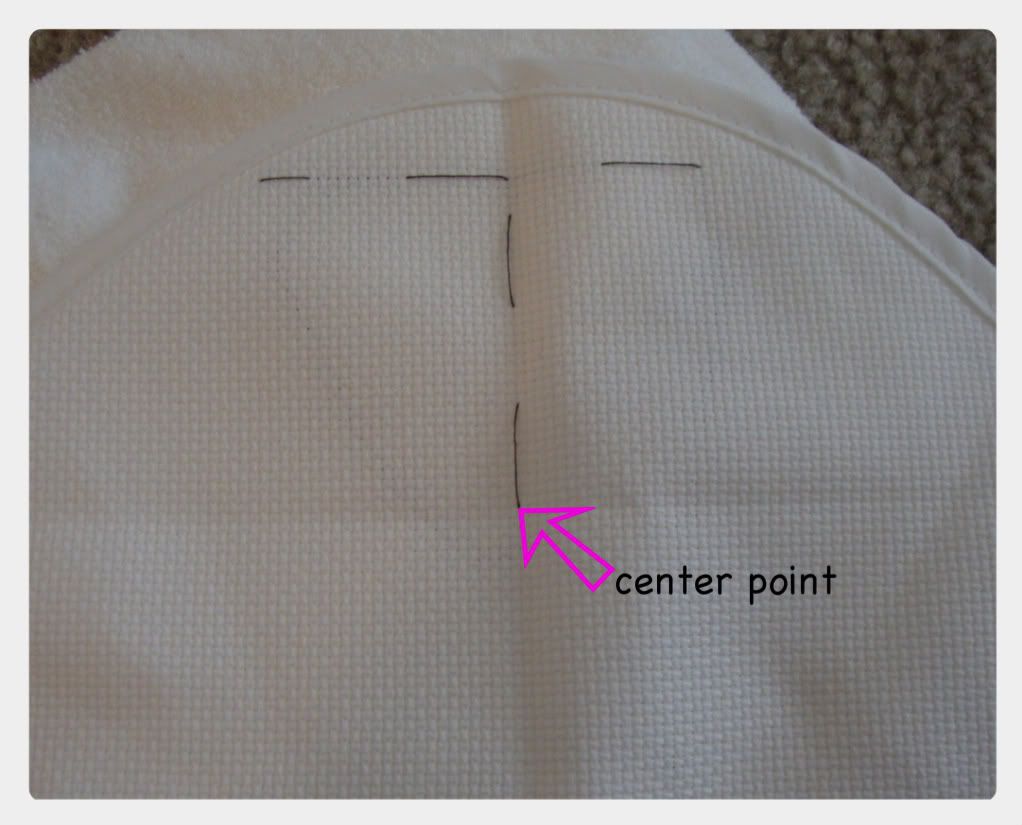
Next, fold your cloth in half width-wise and length-wise. This will mark your center point. Most kits will tell you to start working here. That drives me nuts!! I need to start my pattern from the top and work down, so here is my special tip for the day. All patterns are marked with darker lines that separate the pattern into 10x10 squares. I use black thread and insert my needle into the center from the back. Count up 10 squares and go back in. My pattern has 34 lines above center, so I have 2 black lines showing, and I have taken the thread back through to the front 4 squares later. I then do the same running stitch working towards the left corner, then go back to the middle and work towards the right corner. I now have a T shaped grid that corresponds to the grid on my pattern.
Take your time doing your prep work, this will make the whole process much easier. Please comment with any questions - I'm here to help! It's also a good idea to read all the information in your kit.
Next week we will go over how to read your pattern and how to make the stitches.
Now that you have your kit, there are a few things we need to do before we start stitching.
I am going to be working on a child's hooded towel kit as we go through the process. It is a terry cloth towel with aida fabric in the hood.
Let's open it up and make sure that everything is included. Most kits will contain Aida fabric, colored thread, needle(s) and instructions. Some will also have a thread palette and accessories for the finished design.
Grab a gallon or freezer size plastic zip bag to keep all of the contents of your kit in one place. This is will also keep everything clean and protected when you are not working. You should also place your hoop and embroidery scissors inside {if you don't have embroidery scissors, any small pointy scissors will work, even manicure scissors).

There are two more things to do before we are ready to start - sort colors and prep the fabric.
If your kit included a thread palette, lucky you. If not, they are so easy to make! Just take an index card or a piece of card stock and punch a hole for each of your colors {if you have more than 6 lengths of any color, give it two holes}. Your pattern will have a key for the colors - it will tell you the colors, how many lengths of each are included, and the symbols used for each color. Sort the colors by the order they are listed on your chart and label each color. DO NOT CUT THE THREAD.

Now the fabric for the kit I am starting is already a finished part of the towel, so I can skip this step, you can too if yours is finished or you have a plastic canvas. Otherwise, the edges of the fabric need to be protected from fraying. Use some of your own thread for a blanket stitch around the perimeter. If you have a different stitch you prefer, use it, as long as it will prevent fraying.

Next, fold your cloth in half width-wise and length-wise. This will mark your center point. Most kits will tell you to start working here. That drives me nuts!! I need to start my pattern from the top and work down, so here is my special tip for the day. All patterns are marked with darker lines that separate the pattern into 10x10 squares. I use black thread and insert my needle into the center from the back. Count up 10 squares and go back in. My pattern has 34 lines above center, so I have 2 black lines showing, and I have taken the thread back through to the front 4 squares later. I then do the same running stitch working towards the left corner, then go back to the middle and work towards the right corner. I now have a T shaped grid that corresponds to the grid on my pattern.

Take your time doing your prep work, this will make the whole process much easier. Please comment with any questions - I'm here to help! It's also a good idea to read all the information in your kit.
Next week we will go over how to read your pattern and how to make the stitches.

Good points, Heather! I'm still looking for some of my finished and framed work. I did find a Teenage Mutant Ninja Turtle I did for my son years ago, and was glad to see {on Saturday cartoons} that they are still a popular topic. I'll email you this week to see what I might be able to contribute to your series.
ReplyDelete